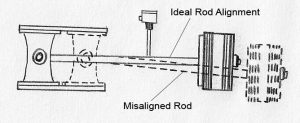
Rod Deflection
 A measurement of rod position or the rod’s actual dynamic motion as it travels back and forth on its stroke. One method to make this measurement is to mount a dial indicator in the distance piece riding on the piston rod. The machine is then barred through a complete cycle. Indicator readings are taken in both the vertical and horizontal directions during the machine’s cycle. The amount of rod deflection is highly dependent on the cylinder alignment with the crosshead. Due to inherent looseness in the crosshead and thermal growth of the machine, higher readings of rod deflection are allowed in the vertical direction. The horizontal direction allowances are much less, and high readings are attributed to misalignment. Typical rod runout allowances are 3.5 to 6.0 mils peak-to-peak (Pk-Pk) in the vertical direction and 1.5 to 2.0 mils Pk-Pk in the horizontal direction. An alternative to dial indicators to make this measurement is an eddy current displacement probe system. Since dial indicators can only be used while the machine is being barred, they do not provide an accurate measurement of rod deflection. On the other hand, eddy current probes can make this measurement while the machine is operating. This provides a highly accurate measurement of the actual dynamic motion of the rod under full-load conditions. Eddy probes for rod runout measurement are typically used on hyper compressors. To withstand the high pressures, the gland seals on these machines are quite complex and small amounts of rod runout will cause these gland seals to fail with severe consequences.
Also known as Rod Runout.
